Friday, October 9, 2009

Electrolysis for rust repair

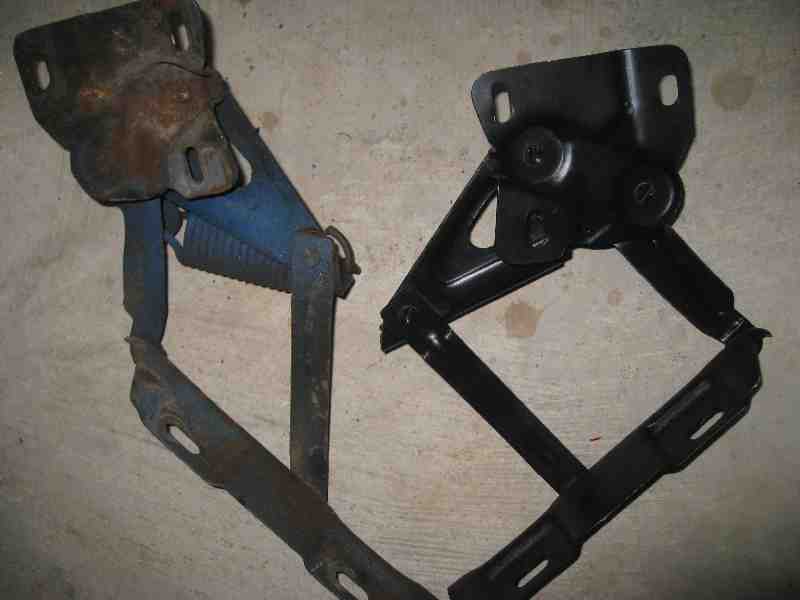
A before and after of my hood hinges using electrolysis. The hinge on the right is painted but it still gives a good idea.


Ever heard of electrolysis as a way to remove rust? Me either until recently.... Its super simple and the most effective way to remove rust I have seen so far. The down side is that it is much easier for small parts than large pieces. My project fits in to the Rustang category so rust is the hardest battle I have on this car. Here is how it works: Take a plastic bucket and fill it with water high enough to completely submerge your rusty part. Its important to note that the bucket must be plastic and not metal. You then want to put in about 1 cup of washing soda per gallon of water. It is similar to baking soda and you can find it at your local grocery store, usually tucked away in an obscure corner. You next want to hang your part in water without letting it touch the bottom. Using a piece of wood over the top of the bucket with string suspended from that works fine. Now you need a sacraficial anaode. In my case I used rebar because it is cheap, easy, and very effective. Cut your rebar so that it is about 6" taller than your bucket and submerge it on the side of the bucket. You need to make sure it does not touch the suspended rusty part so I use a small clamp to keep it pressed on the side and cant move. Take a 12V battery charger and connect the negative side to the rusty part. Yes, that,s right you want to put the negative terminal under the water connected to the rusty part. Make sure the metal part does not touch the rebar and then connect the positive side to the rebar and plug it in. I am using a 12V charger set on 2amps and it works fine. Once its all setup plug it in you will start to see small bubbles starting to form. These bubbles are hydrogen so you want to do this in a well ventilated area. I don't want to scare anyone since the amount of hydrogen being let off is very small but better safe than sorry. The process will turn the rust into Iron oxide with will remain as black sludge on the part which can just be wiped off. The process takes at least a few hours and could be many more depending on the size of the part, the number of sacraficial anodes, the amps, and degree of rust. It's important to note that this is a line of site process so if the rust is behind the rebar you wont see any benefit on that side. As a result most people add additional pieces of rebar around the bucket and connect them by wrapping copper wire from one to the next.Or you can be paitent and rotate your part every couple of hours. Just make sure that you don't touch anything while the charger is turned on. Its also important to note that you can NOT reverse the leads. If you put the positive side on the rusty part it will make it more rusty, so be careful! The actual metal will remain completely untouched so don't worry about leaving it in to long. The only downside is it hard to find a bucket or bath big enough for larger pieces. I have included a couple of pics of my setup below.


Friday, June 19, 2009

Gauge Cluster


Like everything else with this car the gauge cluster was in bad shape. All the chrome had been sanded off and was brush painted black. Of course it was done badly and the black had mostly flaked off so it looked aweful. I was about to replace the bezel and go with brand new autometer gauges which all told run about $1000 when you include the wiring harness. After some random mustang searches on google I stumbled onto a $100 tach made by retrogauge that fits in the center option hole of the cluster. Its available in either white or black faces with either 6k or 8k limits. I got the white face 8k version from mustangs unlimited and it dropped in every bit as easy as they said it would. Although its not as nice as going the autometer route its about $900 cheaper and looks almost as nice. I decided I like the the white gauge faces and I found the Scott Drake white faces that stick onto the orignal faces. They were a little pricey for what they are but they are good quality and look fantastic when applied. The orignal wiper switch was retained but looked pretty bad. I tried finding a replacement but was unable to. I found www.averagejoeresto.com who suggested using steel wool to clean it up, and sure enough 20 minutes later it looks great. As a final touch I painted the needles with some neon orange paint from the local hobby shop. The final product looks awesome and its one more small thing I can check off my list. Here is an after pic which doesnt really do it justice.


Wednesday, June 17, 2009

Dissasembly

I have spent the last 6 months or so taking the car apart and preparing my workshop (aka garage) for this project. Most of the parts are bad or rusted so I didn't bother to catalog much of anything. I pretty much just kept tearing things apart until I had a big pile of rusty stuff. This approach is likely to cause some headaches down the road but its done now so no point to cry about it. Here are some pics of what it looks like now.


A good shot of whats left of the floor. The whole thing is rusted beyond repair and I have a full floor ready to be installed. The problem is common on early Mustangs and it's caused by leaking cowl vents which will also need to be replaced. It's a labor intensive job so most cars have not had it done.


At a glance the front looks pretty good. If you look close at the frame you can see its completely shot and the rust cancer has spread to a point that it is beyond repair. Everything from the firewall forward is coming off. The only possible survivor is the radiator support.


The car was an orignal 289 2V but that was long gone. When I got the car it had a '71 302 with 351 heads, edelbrock performer intake and carb. It was mated to a C4 trans that was puking its guts out. The only thing I might keep is the block, the rest I am getting rid of.

From back to front.....

I decided to ease into this project, starting at the back of the car and work my way forward to some of the more challenging parts. Work is starting on the right rear which will require new trunk floors, inner and outer wheel
wells, a section of frame, and a quarter panel.

I bought a nibbler and rough cut out the qarter panel to see exactly what I had. The quarter had been repaired several times before with patch panels, pop rivets and bondo. It was poorly done to start with but got worse when the previous owner stuffed in 275 wheels that hit the fender. This caused pretty much everything to come apart. Chunks of bondo had come loose, the old pop rivet repair seperated, and the fender had split apart from the wheel well. All of this damage dicated a new quarter instead of patch panels. Once the quarter was off I drilled out the spot welds and popped it all loose with a cut off wheel and an air chisel.
A picture of one of the several patches on the wheel well looking at it from the inside of the car.
The flange held up as well as could be expected considering the amount of rust in there. A little hammer and dolly work will have this straightened out.


As rusty as this looks its just surface rust and really in pretty good condition. A little rust converter paint and then some encapsulator paint and it should look great and be solid for another 40+ years. A little more hammer and dolly work with striaghten this rigth out as well. The spot weld holes that I drilled will be used for plug welds when I install the new wheel well.


It took the better part of a weekend to get this apart and I was pretty happy with how it all went. I got really excited to shove the new wheel well in place to see how it fit and my excitement disipated quickly when it didnt fit very well. I will keep playing with it but right now it looks like a lot of work to get it lined up right.


Tuesday, June 16, 2009

I have been hoodwinked!!


I spent months researching what car I wanted and monitoring the various web pages that sell vintage cars. I knew all the pitfalls and knew exactly what I wanted and what I wanted to pay for it. More importantly I was willing to wait for the right deal to come along. I found a great car but decided not to bid on it until I learned more about what to look for in a purchase. I waited to long and the auction ended before I could bid. I later realized that the car went for a really fair price and wished I had bid. A couple weeks later the car came back up for auction with a "buy it now" and I snapped it up as fast as I could. The pictures, description, and a phone conversation with the owner all confirmed that this was what I was looking for. I wanted a fixxer upper so I could have a project, I didn't want a complete train wreck. After weeks of delays the car finally showed up and what a complete mess!!! The frame is rusted and completely rotten, the engine doesn't start, the brakes don'[t work, doors don't open, just a mess..... It was so bad that when the shipper saw he didn't want to trasnport it! I managed to buy exactly what I didn't want.....I called the seller right away, after several colorful conversations I agreed to a partial refund and kept the car. Its not what I wanted but I like a challenge. The picture here is from the Ebay Motors listing and it looks like its in pretty good shape here. More posts are coming and you will see how bad it is under the skin.